 enEnglisch
Basic operation and symbols
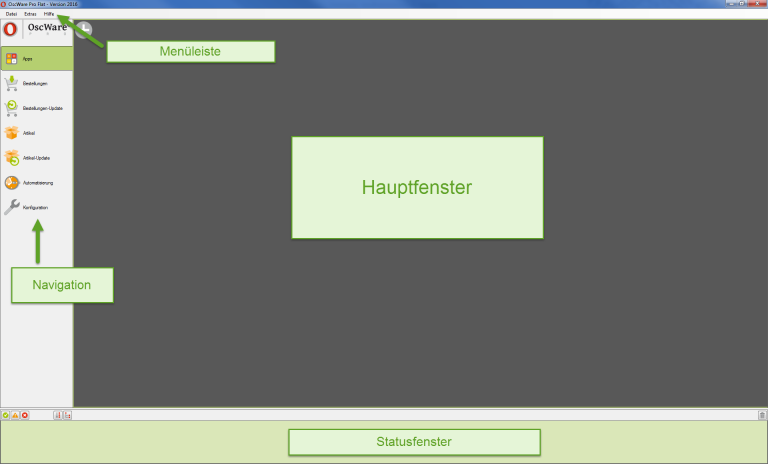
The user interface
The user interface is divided into different areas:
- The menu takes you to basic settings of OscWare®.
- Through the navigation all functions of OscWare® are divided into categories and can thus be found in a targeted manner.
- The main window is the dynamic part of the user interface: Here the actual settings of the currently the actual settings of the currently selected navigation navigation point are displayed.
- In the status window you will find current information, errors and warnings, which can be filtered.
The principle of operation
The individual functionalities of OscWare are all based on the same flowchart.
1. configuration of the accounts or the accounts of the systems used (e.g. xt:Commerce, Amazon and Lexware) in OscWare® (see Configure connection ).
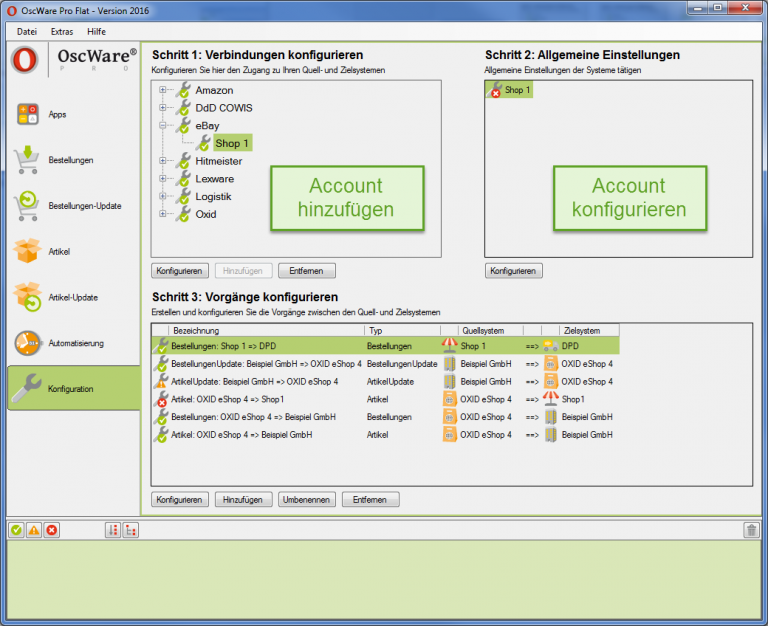
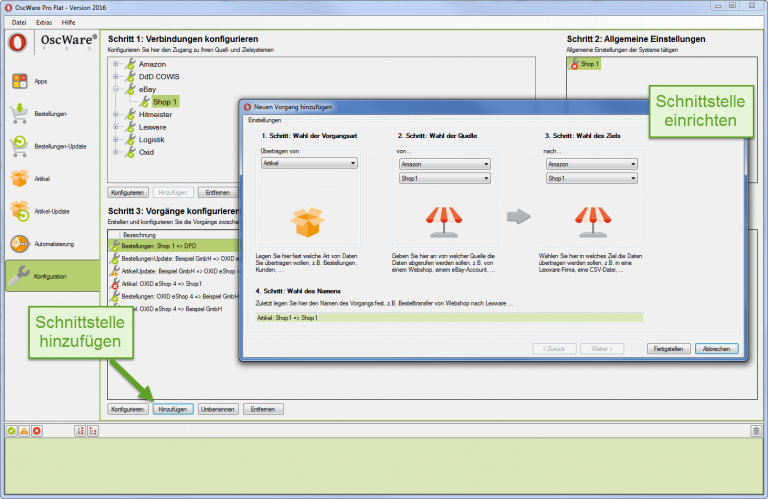
2. subsequent configuration of the interfaces between two of these
systems by selecting a data type, a data source and a data target (see
data destination (see Configuring Operations).
3. data transfer by OscWare® from the source to the target system.
The data transfer can either take place automatically or be triggered individually (settings in Automation).
Status window
The status window outputs various types of status messages:
 Information shows results of a data transfer, for example.
 Warnings
show where the data transfer was disturbed. Via the displayed
link takes you to the relevant location where settings are missing or need to be
or need to be corrected.
Warnings
show where the data transfer was disturbed. Via the displayed
link takes you to the relevant location where settings are missing or need to be
or need to be corrected. Errors also indicate faults in the data transfer, but unlike warnings, they cannot be
but, unlike warnings, they cannot be corrected by you.
Errors also indicate faults in the data transfer, but unlike warnings, they cannot be
but, unlike warnings, they cannot be corrected by you.- Filtering the status messages: Click on the buttons with the icons , and .
- Deleting the status messages: Click on
Minimize windows
- >Tools >
 Settings..., select "General".
 - Set desired options under "Minimize".
- Select Save
Installation information
In the menu bar under the Help tab you will find the ![]() Info window with all relevant data about your OscWare® license:
Info window with all relevant data about your OscWare® license:
- OscWare® support contact details
- User name and registration key
- Information about the operating system
- Your OscWare version
Automatic data transfer
OscWare can be configured in such a way that at program start the automatic data transfer for all configured interfaces and data types. data types is started.
![]() At
data transfer can be defined, in which time interval or at which
interval or at which points in time the data should be synchronized.
should be synchronized. It is only performed when OscWare is active.
At
data transfer can be defined, in which time interval or at which
interval or at which points in time the data should be synchronized.
should be synchronized. It is only performed when OscWare is active.
Before it can start...
...the connection between the systems must have been configured.
1. select automation.
A list is displayed in the main window. Each line represents one data type and the interface between two systems. One of the systems serves as data source, the other as data destination.
Activate automatic data transfer for the desired interface. 3.
Select Add under "Schedules".
The Schedule window is displayed:
![]() The interval must not be less than the time taken by the data transfer itself.
the data transfer itself - otherwise the adjustment is interrupted and restarted.
restarted.
The interval must not be less than the time taken by the data transfer itself.
the data transfer itself - otherwise the adjustment is interrupted and restarted.
restarted.
Therefore, specify at least 15 minutes as the retrieval interval.
A shorter interval can be specified if it is known that the data transfer is actually data transfer will actually take less than 15 minutes. You can test this test this by performing a manual data transfer. 4.
Select the desired setting under "Execution":
- Interval: The data is matched at intervals of several minutes.
- Daily: The data is synchronized daily at specified start times. Several start times can be specified.
- Weekly: The data is synchronized individual days of the week at specified start times. You can specify several start times can be specified.
- Monthly: The data is synchronized individual days of the month at specified start times. You can specify several start times can be specified. 5.
Select Save.
The schedule is saved. 6.
If necessary, add further time schedules.
Set currency rate
The exchange rate for converting foreign currencies can be set manually or determined on a daily basis from the Internet.
1. > Extras > ![]() Settings... , select "Currencies". 2.
Settings... , select "Currencies". 2.
2. set the desired option.
3. select Save.
Timeout for connections
The timeout is the amount of time the server is allowed to take to make the connections to the webshops. For example, if the server is too server is too slow or large amounts of data are requested, the timeout can be can be increased.
1. >Extras >![]() Settings..., select Connection settings.
Settings..., select Connection settings.
2. enter timeout
3. select Save
E-mail sender account
OscWare® can send e-mails on your behalf - e.g. an automatic notification to one of your customers that his order is being order is in process, as soon as it has been transferred from the webshop to Lexware has been transferred.
To use this feature, you need to set up at least one SMTP account through which these emails are sent. If you set up multiple SMTP accounts, you can decide which one of them should be used should be used in connection with which function.
1. > Extras >![]() Settings..., select Email accounts.
Settings..., select Email accounts.
2. select New.
3. enter data and select Apply.
The sender account is set up.
Symbols in "Configuration
When setting up the systems and interfaces, the progress of the configuration is displayed with various icons:
 Fully configured - data transfer fully possible.
 Partially configured - data transfer only partially possible.
 Not or only partially configured - no data transfer possible.
When setting up the interfaces, a different icon is displayed for each system type:
 Lexware-Fima
 Webshop
 eBay account
 Marketplace
 CSV file
 Mobile Commerce
After setting up the interfaces, a different icon will be displayed for each interface type:
 Articles
 Orders
 Bookings
 Customers
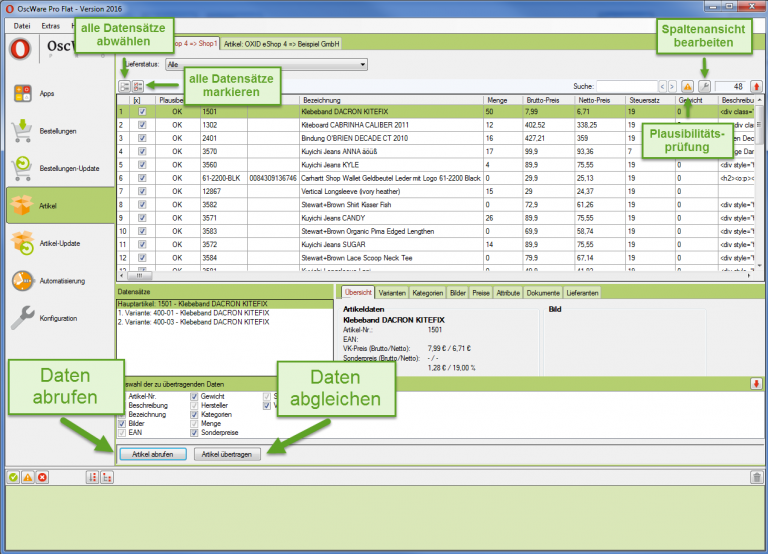
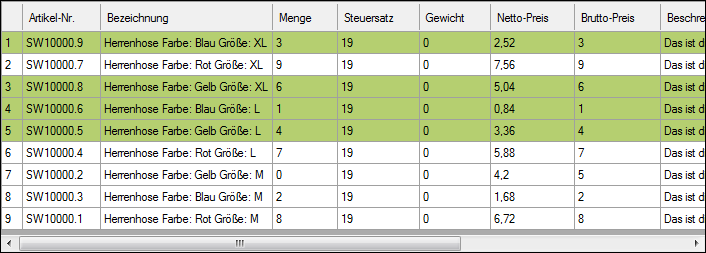
Compile list entries
When transferring data in OscWare® , the data source is queried first. is queried. The queried data are displayed in a list from which all data records to be from which all data records to be synchronized can be selected.
Example:
You want to select rows 1 and 3 to 5.
1. deactivate all list entries with ![]() .
.
![]() With the <Shift> key several consecutive lines can be
can be marked. The <Ctrl> key adds more lines to those already marked.
lines are added to already marked lines.
With the <Shift> key several consecutive lines can be
can be marked. The <Ctrl> key adds more lines to those already marked.
lines are added to already marked lines.
2.Mark line 3.
3.Hold down <Shift> and mark line 5.4<Ctrl> hold down and mark line 1.
Lines 1, 3, 4 and 5 are marked:
Assign values
In OscWare®, data is reconciled between systems. In order for the the reconciliation works, it is necessary to define how data is transferred from one system to the other. In some places in OscWare® tables are used for this purpose.
![]() In some tables, all empty cells must be filled via
In some tables, all empty cells must be filled via ![]() so that the connection is fully configured in OscWare®.
so that the connection is fully configured in OscWare®.
Example:
The shipping types defined in an xt:Commerce webshop are to be assigned to the price groups specified in Lexware.

1. assign a price group in Lexware to a price group in xt:Commerce click on ![]() in the line "Price group" - a window with possible price groups will be displayed.
in the line "Price group" - a window with possible price groups will be displayed.
2. mark price group and select "OK".
3. repeat for the remaining price groups.